Have you ever thought about how sound actually works? It’s pretty wild when you stop to think about it. We hear things all the time, but what’s really happening from a science point of view? This article is all about exploring sound in a hands-on way, turning your space into a cool music laboratory. We’ll look at how vibrations make noise, how our ears pick it up, and even how to make your own instruments. Get ready to experiment and discover the amazing world of sound!
Key Takeaways
- Sound is created by vibrations, which you can often feel, see, and hear.
- Simple materials can be used to make instruments and explore how pitch and volume change.
- Our bodies are amazing sound detectors, and understanding how our ears work helps explain how we hear music.
- Digital tools, like Chrome Music Lab, offer interactive ways to experiment with sound waves and create music.
- Building your own sound devices helps show the basic principles of how instruments produce sound.
Understanding Sound Vibrations in a Music Laboratory
The Human Body as a Sound Sensor
Our bodies are amazing instruments, constantly picking up sound without us even realizing it. Think about it: you "feel" the bass at a concert, right? That’s your body acting as a sound sensor. It’s not just your ears doing the work.
- Skin: Sensitive to vibrations.
- Bones: Conduct sound, especially in the skull.
- Nerves: Translate vibrations into signals for the brain.
It’s easy to forget that sound isn’t just something we hear; it’s a physical phenomenon that interacts with our entire being. The way our bodies interpret these vibrations is super complex, and it varies a lot from person to person.
Exploring Sound Wave Generation
Sound waves are created when something vibrates. It could be anything! A guitar string, your vocal cords, or even a tuning fork. The vibration pushes the air around it, creating areas of high and low pressure that travel outward. The frequency of the vibration determines the pitch of the sound. The more rapid the vibration, the higher the pitch. Let’s look at some examples:
- Vocal Cords: Air passes over them, causing them to vibrate.
- Speakers: A cone vibrates, pushing air.
- Instruments: Strings, reeds, or air columns vibrate.
How the Ear Receives Sound Waves
The ear is a complex organ designed to capture and interpret sound waves. Sound waves enter the ear canal and cause the eardrum to vibrate. These vibrations are then transmitted through tiny bones in the middle ear to the inner ear, where they stimulate hair cells. These hair cells convert the vibrations into electrical signals that are sent to the brain, which interprets them as sound. It’s a pretty wild process when you think about it. Here’s a simplified breakdown:
- Sound waves enter the ear canal.
- Eardrum vibrates.
- Tiny bones transmit vibrations.
- Hair cells convert vibrations to electrical signals.
- Brain interprets signals as sound.
| Part of Ear | Function |
|---|---|
| Eardrum | Vibrates in response to sound |
| Ossicles | Amplify vibrations |
| Cochlea | Converts to neural signals |
Hands-On Music Laboratory Stations
Time to get our hands dirty! This section is all about setting up some super engaging stations where students can really feel the science of sound. We’re moving beyond just talking about sound and diving into activities that let students explore sound in a tangible way. These stations are designed to be quick, fun, and educational, so let’s get started!
Electronic Oscillo-Piano-Scope Exploration
This station uses technology to visualize sound. Students can use an online oscilloscope to see sound waves in real-time as they play a virtual piano. It’s a great way to connect the abstract idea of sound waves to something visual and interactive. You can even use this as a whole class activity for inquiry-based learning. If you have technical issues with the embedded applet, you can use Academo’s amplitude modulation app, be sure to turn on the sound and slide A2 all the way down to 0.0, and use the f1 slider only.
Crafting Straw Pipes and Pan Flutes
This is a classic activity that never gets old. Students create their own simple instruments using straws. By cutting the straws to different lengths, they can explore how the length of a vibrating column of air affects the pitch of the sound. It’s a simple, hands-on way to understand the relationship between size and sound. Here’s a quick guide:
- Gather straws and scissors.
- Cut straws to varying lengths.
- Arrange them in order of length.
- Secure them together to form a pan flute.
Investigating the Hydro-Xylophone
This station uses water-filled glasses or bottles to create a xylophone. By changing the amount of water in each container, students can change the pitch of the sound produced when the container is struck. It’s a great way to explore how the density of a medium affects sound. It’s also just plain fun to make music with water!
This activity is great because it’s so simple, yet it demonstrates a key principle of sound. The amount of water directly impacts the vibration and therefore the pitch. It’s a very direct and understandable relationship for students to grasp.
Creative Sound Experiments in the Music Laboratory
Let’s get into some fun, hands-on experiments that really show how sound works. These are great for getting creative and seeing sound in action. It’s all about making sound visible and tangible.
Building an Old-School Telephone
Remember those tin can phones from childhood? We’re recreating that experience, but with a bit more science behind it. This experiment demonstrates how sound waves can travel through a solid medium. All you need are:
- Two paper cups
- String (about 20-30 feet)
- Paper clips
- Make a small hole in the bottom of each cup.
- Thread one end of the string through the hole in one cup and tie a paper clip to the end to prevent it from slipping back through.
- Repeat with the other end of the string and the other cup.
- Have one person hold a cup to their ear while another person speaks into the other cup, making sure the string is taut. This is a great way to explore sound vibrations.
Observing Pepper on the Dance Floor
This experiment is a visual treat! It shows how sound waves can cause vibrations in a physical medium. It’s like a tiny dance party for pepper. Here’s what you’ll need:
- A speaker
- Plastic wrap
- Rubber band
- Salt or pepper
- A bowl
- Stretch the plastic wrap tightly over the bowl and secure it with a rubber band.
- Sprinkle a thin layer of salt or pepper on top of the plastic wrap.
- Place the speaker near the bowl and play music or generate tones.
- Observe how the salt or pepper moves and "dances" in response to the sound vibrations. The higher the frequency, the more intense the movement.
The Science of Plucking a Stick
This simple experiment explores how different materials vibrate to produce sound. It’s a hands-on way to understand frequency and pitch. Gather these items:
- A ruler or a thin wooden stick
- A table or desk
- Place one end of the ruler on the edge of the table, holding it firmly in place.
- Pluck the free end of the ruler and observe the sound it makes.
- Adjust the length of the ruler that extends over the edge of the table and pluck it again.
- Notice how the pitch changes as you change the length. Shorter length equals higher pitch, and vice versa.
This experiment is a great way to introduce the concept of frequency. The shorter the length of the stick, the faster it vibrates, resulting in a higher frequency and a higher pitch. It’s a simple but effective way to demonstrate the relationship between vibration and sound.
Music Laboratory Activities for Deeper Learning

Reviewing Sound Station Discoveries
Okay, so you’ve spent some time at the different sound stations. Now what? It’s time to actually think about what you saw and heard. The goal here isn’t just to do the activities, but to understand the science behind them. Think about what was vibrating in each station, how the sound changed when you changed something, and what that tells you about sound waves.
- What surprised you the most?
- Did you notice any patterns?
- How did changing one thing affect the sound?
It’s easy to rush through these activities, especially if you’re trying to get everything "right." But take a breath and really listen. The point is to explore and discover, not just to check off a list.
Connecting Sound to Science and Art
Sound isn’t just a science thing; it’s a big part of art too, especially music. How does understanding sound waves help you appreciate music more? Think about how different instruments create different sounds, and how those sounds make you feel. Can you relate the science of sound to other art forms, like painting or dance? Maybe the way sound waves travel can be like the way a painter uses brushstrokes, or how a dancer moves through space. You can even use Chrome Music Lab to explore these connections.
Making Music with Everyday Objects
Who says you need fancy instruments to make music? Look around you. There’s sound waiting to be made everywhere! Grab some glasses and fill them with different amounts of water. Bang on pots and pans. Stretch rubber bands over boxes. The possibilities are endless. The point is to experiment and see what sounds you can create. Think about how you’re changing the vibrations to change the sound. Can you create a simple tune using only cup instruments?
Here’s a simple table to get you started:
| Object | How to Make Sound | What Changes the Sound? |
|---|---|---|
| Glass of Water | Tap the side | Amount of water |
| Rubber Band | Pluck it | Tension, length |
| Ruler | Pluck it while on desk | Length of overhang |
Exploring Musical Instruments in the Music Laboratory

This section is all about getting hands-on with how different instruments create sound. We’re not just talking about guitars and pianos; we’re diving into the nitty-gritty of vibrations, pitch, and how instruments amplify sound. It’s about understanding the physics of music through experimentation.
Investigating Stringed Instruments
Let’s start with strings! We’ll explore how the length, thickness, and tension of a string affect the sound it produces. Think about a guitar: thicker strings create lower notes, while shorter strings create higher ones. We can even build our own simple stringed instruments to test these principles. Participants will engage in hands-on activities to construct musical instruments, exploring concepts like vibrations, frequency, and pitch using various materials.
Here’s a simple experiment:
- Gather different lengths of string (fishing line, yarn, etc.).
- Attach each string to a stable base (like a ruler taped to a table).
- Pluck each string and observe the sound. Does a longer string produce a lower or higher pitch?
Creating Custom Cup Instruments
Time to get creative with cups! By filling cups with varying amounts of water and tapping them, we can create a simple xylophone. The amount of water changes the mass that vibrates, thus changing the pitch. It’s a fun way to visualize how different amounts of material produce different sounds. This is a great way to explore musical instruments in a simple way.
Here’s what you’ll need:
- Several identical cups or glasses
- Water
- A spoon or mallet for striking
Generalizing How Instruments Produce Sound
Now, let’s take a step back and think about what we’ve learned. What do all instruments have in common? They all have something that vibrates! Whether it’s a string, a column of air, or a solid object, vibration is the key. And they all have a way to change the pitch, whether it’s by changing the length of a string, the amount of water in a cup, or the length of a tube.
The goal here is to help students generalize that all instruments, regardless of their form, rely on the same basic principles of vibration and resonance to create sound. By understanding these principles, we can appreciate the ingenuity and creativity behind musical instrument design.
Chrome Music Laboratory for Interactive Learning
Chrome Music Lab is a fantastic resource for bringing music to life in an interactive way. It’s all online, so no need to download anything! It’s a great way to explore music concepts without needing any fancy equipment. It makes learning about music accessible and fun.
Utilizing the Oscillator for Sound Exploration
The Oscillator tool in Chrome Music Lab is super cool. You can change the wave type (sine, square, triangle, sawtooth) and hear how it affects the sound. It’s a simple way to visualize and understand how different waveforms create different timbres. I remember one time, Sarah was messing around with the oscillator and discovered that she liked the sound of the sawtooth wave the best. It’s all about experimenting and finding what sounds good to you. It’s a great way to explore sound and its properties.
Experimenting with Strings in the Music Lab
The Strings experiment lets you see how changing the length, thickness, and tension of a string affects its pitch. It’s a visual way to understand the physics of stringed instruments. You can pluck the strings and see the vibrations. It’s a lot more engaging than just reading about it in a book. It’s a great way to understand how stringed instruments work.
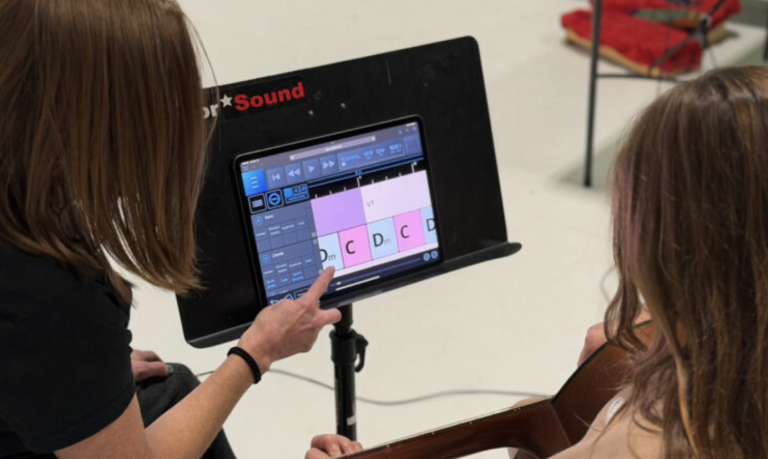
Crafting Original Songs with Song Maker
Song Maker is probably the most popular tool in Chrome Music Lab. It’s a simple grid-based sequencer where you can create melodies and rhythms. You can choose different instruments, change the tempo, and even add drums. It’s really easy to use, even if you don’t know anything about music theory. You can create something cool in just a few minutes. Plus, you can share your songs with others. It’s a great way to craft original songs and express your creativity.
Chrome Music Lab is a great way to get started with music. It’s free, easy to use, and doesn’t require any special equipment. It’s a fun way to learn about music and experiment with sound. It’s a great resource for teachers, students, and anyone who wants to explore the world of music.
Essential Materials for Your Music Laboratory
Seeing and Dancing Sound Waves
To really see sound, you’ll need a few things. For the classic tuning fork demo, grab a tuning fork and a bowl of water. It’s super simple but effective. To make sound dance, you’ll need a portable speaker, a large bowl, some plastic wrap, a rubber band, and either rice or salt. The smaller the granules, the better the effect!
Materials for String Instrument Creation
Time to get crafty! For building your own string instruments, gather tissue boxes, paper, pencils, rubber bands, string, yarn, tape, and paper clips. Basically, anything you can use to create tension and vibration. The goal is to experiment with different materials to see how they affect the sound.
Recommended Books and Recordings
To deepen your understanding of sound and music, consider adding a few key resources to your lab. A good introductory book on acoustics can be invaluable. Also, a diverse collection of musical recordings, spanning various genres and cultures, will expose students to a wide range of sonic possibilities. Don’t forget resources that explain music technology tools for educators.
Here are some ideas to get you started:
- A basic acoustics textbook
- A collection of world music recordings
- Biographies of famous composers
Conclusion
So, we’ve gone through a bunch of cool sound experiments, right? From feeling the hum in your throat to messing around with those digital piano-scopes, it’s pretty clear that sound is all about vibrations. It’s not just some abstract thing; it’s something you can see, feel, and even make dance. Hopefully, this little lab experience showed you that music and sound aren’t just magic. There’s a whole lot of science happening behind every note and every beat. It’s pretty neat when you think about it.
Frequently Asked Questions
What exactly is Chrome Music Lab?
Chrome Music Lab is a cool website that makes learning about music super easy and fun through hands-on activities.
What can I use Chrome Music Lab for?
Teachers use Chrome Music Lab in their classes to explore music and how it connects to science, math, art, and even dance. You can also use it with live instruments.
Can I make my own songs with it?
Yes, you totally can! Check out the Song Maker experiment. It lets you create and share your very own tunes.
Do I need to sign up for an account?
Nope, no account needed! Just open any experiment and start playing around. It’s that simple.
Is Chrome Music Lab free?
Chrome Music Lab is a free tool from Google. It’s part of their Chrome Experiments, which are projects that show off what you can do with web technology.
What devices can I use Chrome Music Lab on?
Chrome Music Lab is designed to work on most modern web browsers and devices, including computers, tablets, and smartphones.